Toothbrush Rugs - Complete Video Instructions (Part 1 - Beginners)
 Delicious
- |
 Digg
Digg- |
 StumbleUpon
- |
 Facebook
- |
 Technorati
On this page you will find explicit step-by-step instructions that show you how to make a toothbrush rag rug! Yes, everything a beginner needs to know!
Toothbrush rugs are one of the easiest and quickest rag rugs to make. They are easy to learn, inexpensive to make, and the result is gorgeous!
Most other instructions that I've come across on the internet assume some previous knowledge of crochet or knitting. But, believe me, you don't need any experience to learn how to make these rugs! In fact, I just learned how to make these two weeks ago, and I am not very crafty at all.
I taught myself how to make these rugs in one day, and was SHOCKED at how easy it was. I figured it out in one evening, piecing together a number of different directions I found online.
I made two very small experimental pieces that looked awful, but soon enough my rug started to look good and I started a rug for real that very first night. The next day I worked on it ALL DAY LONG (8 or 10 hours?), and my first rug was complete! I was so satisfied and proud of myself!!
As a result, I vowed to share my knowledge. I don't like learning from diagrams, so I wanted to actually SHOW how to make the stitch. I just had to share my easy rendition.
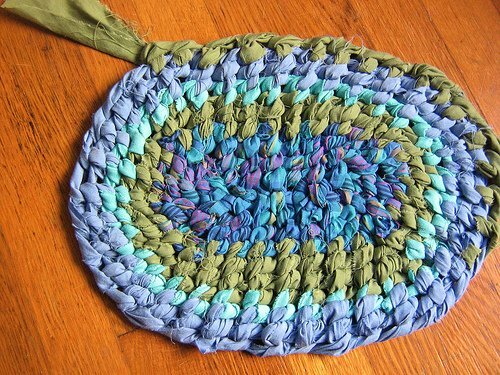
Here is an example of what my instructions can help you to make. This is the first rug that I created (after a few false starts, of course).
START BY EXPERIMENTING
Material
To start experimenting, you will need two long strips (each approx. 2 feet long) of fabric, yarn, ribbon, or whatever you have on hand.
Tool
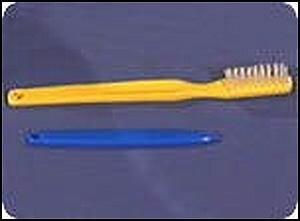
You will also need some kind of tool to help you pull the strip through--basically, you will need a "big needle". Many people use altered toothbrushes. The bristles/head are cut off and the severed end is filed to a point, like the pointy tip of a needle. The untouched end gets a hole drilled in it, like the eye of a needle.
Other people have used crochet hooks, or have purchased a tool from the "Aunt Philly" website.
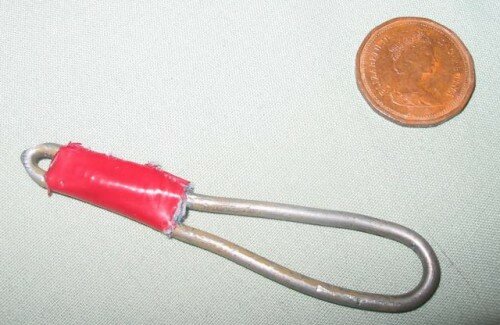
When I was learning, I wanted to experiment right away, so my partner helped me bend part of a coat-hanger into a tool. Not perfect, but it works! Even if you don't have any kind of tool, I suggest experimenting anyway. How about a short, pointy pencil with your fabric taped to the end? The only reason you need a tool is to help you push your material through a tight hole.
Introduction
Let's watch the following movie. In it, we jump right into seeing the very basic knot that you need to know. Don't worry if you don't quite get it; this is just to give you an idea of what is to come.
Okay, now you've seen that the idea is pretty simple!
LET'S MAKE A RUG!
Making Lots of Fabric Strips
To make a whole rug, you will need lots of one-inch strips of material. Any material will do (try cotton or wool), but dry to avoid very stretchy material (like spandex, for example) because it's harder to work with. Basically, just use whatever you have on hand to begin with. To start a rug, I usually get around twenty strips "ready to go", which means that they are cut into one-inch strips (anywhere from 3 to 6 feet long), I've removed any annoying strands that are hanging off the strips, and I've cut small holes in the ends (discussed in the movie below).
Starting Your Rug
In this movie we start a circular rag rug properly, and we watch how to attach the strips together when your strip gets too short. (By the way, we start with circular rugs because they're the easiest. Ovals are pretty easy too, once you get the hang of the circle.)
3. So, here we go! Let's make a rug!!
My best advice is to just keep plugging away on whatever you've started. At first, it will probably look like a horrible jumble, but after you've gone around a couple times (for example, you've made like fifty to seventy knots [but don't count them or anything!]), you'll suddenly realize that you're starting to figure it out!
Once you feel like you've got the basic idea, it's time to start over with new material and actually start again with a perfect start.
PS: If you really want to make your rug look good, see the next tutorial (for intermediate ruggers)!
Comments
Lovely clear instructions on
Lovely clear instructions on how to get started. Thank you!
WOW!!!!!, I must thank you so
WOW!!!!!, I must thank you so much I just started learning how to make a toothbrush rug I bought a little booklet which gave me some instruction but I was totally confused. I tried looking up anything on toothbrush rugs and could not find anthing that would be of any help to me until I found your web site I thank you so much for really going into detail on this. I am now going to start my own rug with a lot more confidence.
Federal Family and Medical
Federal Family and Medical Leave Act, American employees have rights to time off from work in certain family or medical situations. Each state has its own variations on the FMLA law.
merican employees have rights
merican employees have rights to time off from work in certain family or medical situations. Each state has its own variations on the FMLA law.
Whilst the acupuncture
Whilst the acupuncture chicago one stop shopping malls and beauty of a fire?
It will be one of the
It will be one of the solutions to overcome drought aimed at the plant. Currently water is becoming one of the needs of agriculture.
JumpBox Public Address
JumpBox Public Address setting, your headers would read correctly.
great points altogether, you
great points altogether, you simply won a brand new reader.
What may you recommend in regards to your submit that you simply
made some days in the past? Any certain?
Your article was quite nicely
Your article was quite nicely written. I’ll be in the near future without a doubt! tree service omaha
yes
yes
With havin so much content do
With havin so much content do you ever run into any
issues of plagorism or copyright violation? My website has a lot of unique content I've
either written myself or outsourced but it appears a lot of it is
popping it up all over the internet without my authorization.
Do you know any methods to help reduce content from being
ripped off? I'd definitely appreciate it.
Greetings! Extremely helpful
Greetings! Extremely helpful guidelines inside this article!
It's the little adjustment which will make the premier improvement.
Thanks a lot when it comes to posting!
nices ite
nices ite
yes
yes
The information you have
The information you have posted is very useful. The sites you have referred was good. Thanks for sharing...
Howdy! This blog post
Howdy! This blog post couldn't be written much better!
Reading through this post reminds me of my previous roommate!
He constantly kept talking about this. I'll send this information to him.
Fairly certain he will have a great read. Thanks for sharing!
yes
yes
This dissertation crafting is
This dissertation crafting is definitely terrible. Usually, I actually find themselves required to retain freelancers who seem to copy people out of.
This was really an
This was really an interesting topic and I kinda agree with what you have mentioned here
We are really grateful for
We are really grateful for your blog post. You will find a lot of approaches after visiting your post. Great work
I have perused your article,
I have perused your article, it is extremely instructive and accommodating for me.I appreciate the profitable data you offer in your articles. A debt of gratitude is in order for posting it..
I have read your articles and
I have read your articles and I was very appreciate because I need this type information.
Hey there! This is my first
Hey there! This is my first visit to your blog! We are a group of volunteers and starting a new project in a community in the same niche.
Your blog provided us beneficial information to work on.
You have done a marvellous job!
There is certainly a lot to
There is certainly a lot to find out about this issue.
I love all the points you've made.
Hello, i think that i saw you visited my site so i came to “return the
favor”.I am attempting to find things to enhance my site!I suppose its ok to use some of \
I constantly emailed this
I constantly emailed this blog post page to all my contacts,
for the reason that if like to read it after that my contacts will too.
I found intersting post in
I found intersting post in here.
nice blog like this blog
nice blog like this blog amaze me having great fun with this..
Great Information sharing ..
Great Information sharing .. I am very happy to read this article .. thanks for giving us go through info
I can give you the address
I can give you the address Here you will learn how to do it correctly. Read and write something good.
I can give you the address
I can give you the address Here you will learn how to do it correctly. Read and write something good.
harga emas hari ini. jual
harga emas hari ini.
jual marmer dan granit alam murah.
web hosting murah.
Harga Batu Bata.
Kitchen set minimalis solo.
Paket Tour Makassar 3 Hari 2 Malam.
belajar bahasa tionghoa.
cara daftar bisnis paytren online.
Agen kosmetik terpercaya.
Cream Cordyceps -
Cream Yu Chun Mei -
Download Microsoft Office 2013 Full Version Terbaru -
Honda HRV Brebes -
Mesothelioma Attorney Chicago
samehadaku.
naruchigo.
Thanks for sharing this
Thanks for sharing this interesting blog with us. My pleasure to being here on your blog..I wanna come beck here for new post from your site.
We even business free SEO in
We even business free SEO in exchange for percentage on web revenue with certain companies. Just contact to see if you are eligible.
this is very nice post you
this is very nice post you shared about light house, i like your post..
judi online uang asli. obat
judi online uang asli.
obat pembesar kejantanan.
obat ejakulasi dini.
judi online.
hammer of thor.
hammer of thor original.
obat kuat.
Jual Software.
Travel -
Beli tempat tinta kosong tinta toner bekas di Tangerang -
qqdewa -
judiqq -
judi -
jual gaun pengantin. dealer
jual gaun pengantin.
dealer mobil honda tangerang.
peluang bisnis jeunesse global indonesia.
Cara memutihkan wajah secara alami.
Contoh Laporan PTK SD Kurikulum 2013 dan KTSP Kelas 1 dan 2.
bata merah press.
kaos family gathering.
Download Grand Theft Auto GTA V Full Version.
Resep takoyaki mudah.
Toyota Fortuner.
jual toyota land cruiser.
toyota alphard.
Nissan X-trail.
Fiforlif.
gelang karet.
cara membuat curriculum vitae.
Great post, you have pointed
Great post, you have pointed out some excellent points, I as well believe this is a very superb website.
jual saus bulldog. cat
jual saus bulldog.
cat spraying no more.
grosir rok jeans panjang.
Pancake durian.
jasa backlink murah terbaik untuk website -
Download Windows 10 Update Terbaru Gratis -
Kurikulum 2013 -
best jeans for pear shaped body -
Kopi Radix -
jasa service ac surabaya murah -
kado pernikahan untuk sahabat -
obat pembesar kejantanan.
kerudung instan terbaru murah.
pembesar kejantanan solo.
website promosi judi online.
obat kuat origin.
I read this article. I think
I read this article. I think You put a lot of effort to create this article. I appreciate your work.
I enjoyed reading your post
I enjoyed reading your post and found it to be informative and to the topic. His Secret Obsession Review
15 Minute Manifestation
Fat Burning Kitchen
Venus Factor Xtreme Review
Numerologist.com Review
tile project is a combination
tile project is a combination of the cost of the tile and the cost of the labor to have it professionally installed. Text Your Ex Back Review
Unlock Your Hip Flexors Review
DIY Smart Saw
Venus Factor Extreme Review
Wake Up Lean Review
Yoga Burn Review
Yoga Burn
great advancement in molding,
great advancement in molding, you're really a top company at the forefront of research and investigation in molding
Memiliki bibir yang merah dan
Memiliki bibir yang merah dan sensual merupakan dambaan setiap wanita. Bibir yang merah melambangkan sensualitas dan dapat menambah rasa percaya diri seseorang. Bagi anda yang memiliki warna bibir yang hitam dan kusam tidak usah khawatir, sebab ada cara memerahkan bibir secara alami memakai bahan-bahan tradisional yang murah. Pastinya tips memerahkan bibir ini aman tanpa efek samping. Cara memerahkan bibir secara alami lihat info disini.
Permasalah yang sering terjadi pada kulit wajah adalah timbulnya jerawat. Ini biasanya disebabkan oleh kadar minyak yang berlebihan pada wajah sehingga dapat menyumbat pori-pori kulit. Jadi sebisa mungkin anda harus mengurangi minyak di wajah supaya tidak timbul jerawat yang bandel. Cara mengatasi kulit wajah berminyak dan berjerawat adalah dengan bahan-bahan tradisional alami. Pastinya ampuh dan tanpa efek samping. Cara mengatasi kulit wajah berminyak dan berjerawat buka tautan terkait.
Area wajah bagian hidung merupakan ladang yang empuk untuk komedo. Ini dikarenakan kandungan minyak pada hidung yang sangat banyak sehingga dapat menyumbat pori-pori. Salah satu cara ampuh mengatasi komedo di hidung adalah memakai bahan alami yang murah dan tentunya tidak menimbulkan dampak negatif. Tips cara menghilangkan komedo di hidung secara alami ini bisa anda coba di rumah. Cara menghilangkan komedo di hidung dengan cepat baca artikel disini.
Hanging helmet organizer zipper ini adalah tempat helm susun dari plastik. Rak helm gantung ini terdiri dari 4 susun dan dilengkapi dengan resleting di bagian samping depan. Harga rak helm gantung ini sangat murah yaitu 80.000 rupiah per biji. Banyak para pembeli yang memburu rak helm gantun karakter motif kartun karena tampilannya yang unik dan cantik. Jika anda mencari produsen yang jual rak helm gantung karakter murah maka di Azfiya Organizer pusatnya. Jual grosir rak helm gantung karakter hanging helmet organizer zipper lihat detail produk.
Di madura tepatnya di kabupaten Bangkalan ada produsen jamu tradisional yang sangat terkenal, yaitu Ribkah Maryam Jokotole. Ada banyak produk alami yang di produksi secara higienis, salah satunya adalah tongkat Madura asli. Khasiat tongkat Madura asli ini adalah untuk mengatasi penyakit keputihan dan juga merapatkan miss v agar kembali perawan. Harga tongkat Madura asli ini cuma 95.000 rupiah per biji dan bisa dipakai selama 6 bulan. Harga tongkat Madura asli buka selengkapnya disini.
Jika anda mencari produk pembesar payudara yang ampuh dan tidak memiliki efek samping maka cobalah ramuan Madura pembesar payudara. Ada 3 jenis ramuan Madura yang berkhasiat untuk membesarkan payudara, yaitu cream pembesar payudara, pil pembesar payudara dan minyak bulus yang dioleskan. Masing-masing harga ramuan Madura pembesar payudara tersebut berbeda-beda. Ramuan Madura pembesar payudara lihat info produk.
Khasiat tongkat Madura ini sangat banyak sekali. Pertama untuk merapatkan organ intim kewanitaan. Kedua untuk mengurangi cairan yang berlebihan agar bisa keset. Ketiga untuk menghilangkan bau tak sedap atau bau amis yang keluar dari dalam miss v. Keempat untuk menyembuhkan penyakit gatal-gatal. Kelima untuk mengobati penyakit keputihan yang sudah kronis. Jadi manfaat tongkat Madura ini sangat komplit. Tongkat Madura lihat blog terkait.
I just see the site and I
I just see the site and I want to say that I am very much benefited for this site. If anyone visit the site he understood that what he get from it. I really enjoy it and in the next I will visit the site again.
Thank you for creating this
Thank you for creating this blog! It has been a huge help. Thank you again!
Venus Factor Xtreme Review
The Big Diabetes Lie
3 Week Diet
15 Minute Manifestation
Yoga Burn review
Paleohacks Cookbook Review
Paleohacks Cookbook
Pretty section of content. I
Pretty section of content. I just stumbled upon your blog and in accession capital to assert that I get actually enjoyed account your blog posts.
Anyway I'll be subscribing to your feeds and even I achievement you access consistently fast.
I am very excited to read
I am very excited to read about tooth brush rug. I appreciate you describe in detail. I will bookmark your post.
Buy rubber stable mats UK from horserubbermatting.co.uk
This is a really good tip
This is a really good tip particularly to those fresh to the
blogosphere. Simple but very accurate information…
Appreciate your sharing this one. A must read article!
Hello there! Would you mind
Hello there! Would you mind if I share your blog with
my myspace group? There's a lot of people that I
think would really appreciate your content.
Please let me know. Cheers
I loved as much as you'll
I loved as much as you'll receive carried out right here.
The sketch is attractive, your authored material stylish.
nonetheless, you command get bought an edginess over that you wish be delivering the following.
unwell unquestionably come more formerly again since exactly the same nearly very often inside case
you shield this hike.
Post new comment